Hi Void,
Here's ... The old office. It's is a detective office with some Chicago 20's style inspiration.
It's render with Unreal and have a loooot of items. It was a training work for Substance Painter, Designer, Unreal and Blender.
Tuesday, 21 April 2020
Thursday, 9 April 2020
Oh my... Blender!
Hello there Void,
This an entry about 3D thoughts (to the hell with the coronavirus! xD)
Almost two years ago, finally enter in a small game studio call Gone Mad Studios, developing a small mobile platform puzzle game calle Hatventure (you can download in the Play Store here).
Ok, this studio used Blender for develop its projects and I was full time with 3D Studio Max, but I wanted kick off this damn and shi*ty software, so it was my kickstart to change.
That was really AWESOMEEEEE!!. Maybe don't have all the same utilities as other more developed programs (like custom mirroring axis, or the crazy bend modifier), but trust me...this is one of the best DCC ever!
It took me back all my excitement, eagerness and passion about create worlds and 3D art!!
It have an amazing community and developers (Like Pablo Dobarro, Dalai Felinto, Pablo Vasquez and many others) a very stong and stable releases.
You can make awesome art, and it simply works!!
Currently I don't need other DCC (well' this is not true... I still in love with Zbrush and Substance!!) but a general purpose DCC... really, I don't need any other.
I invite you to try it... you don't regret ;)
Have a lovely dayyy!!!
Wednesday, 26 April 2017
My little chibi
(Last Update): At last my chibi es completed. I prefer not texturing in order to keep that toy appearance. Too serius maybe, but gambit is a serious man !! (I know, i know, gambit always is fliting with Rogue)
Tuesday, 4 April 2017
Running up that building!
Hi my little Void!!
Today (well better said tonight) I start a new proyect for my new portfolio. In the next days I'll open my Artstation and Sketchfab to be more interactive. I asked to my wife for inspiration and whe tell me "why not a building to start? You love architecture so... And I decided that is a good idea. In addition I've restart one old proyect: my Russian Kamov attack helicopter.
So let's go!!
In these days I has been realized that my relationship with 3D Max has been deteriorated due to my progress with Zbrush; Zbrush is more friendly and stable and more focused to the artist (is not as technical as MAX... is more "just take your pencil and sculpt, not worried about topology or UVs)
Anyway, return to the subject, I wanted refresh my 3D MAX skills (modelling, unwrapping and Texturing) so decided that my building set will be made on 3D MAX. Yesterday finished the modelling phase (or...well... you know... this never ends just give up) and this is the firs result:
It's at a very early stage but start to take shape. Now the unwrap phase.
What do you think?
Take care Void
Today (well better said tonight) I start a new proyect for my new portfolio. In the next days I'll open my Artstation and Sketchfab to be more interactive. I asked to my wife for inspiration and whe tell me "why not a building to start? You love architecture so... And I decided that is a good idea. In addition I've restart one old proyect: my Russian Kamov attack helicopter.
So let's go!!
In these days I has been realized that my relationship with 3D Max has been deteriorated due to my progress with Zbrush; Zbrush is more friendly and stable and more focused to the artist (is not as technical as MAX... is more "just take your pencil and sculpt, not worried about topology or UVs)
Anyway, return to the subject, I wanted refresh my 3D MAX skills (modelling, unwrapping and Texturing) so decided that my building set will be made on 3D MAX. Yesterday finished the modelling phase (or...well... you know... this never ends just give up) and this is the firs result:
What do you think?
Take care Void
Saturday, 4 March 2017
Hi there Again
Last update:
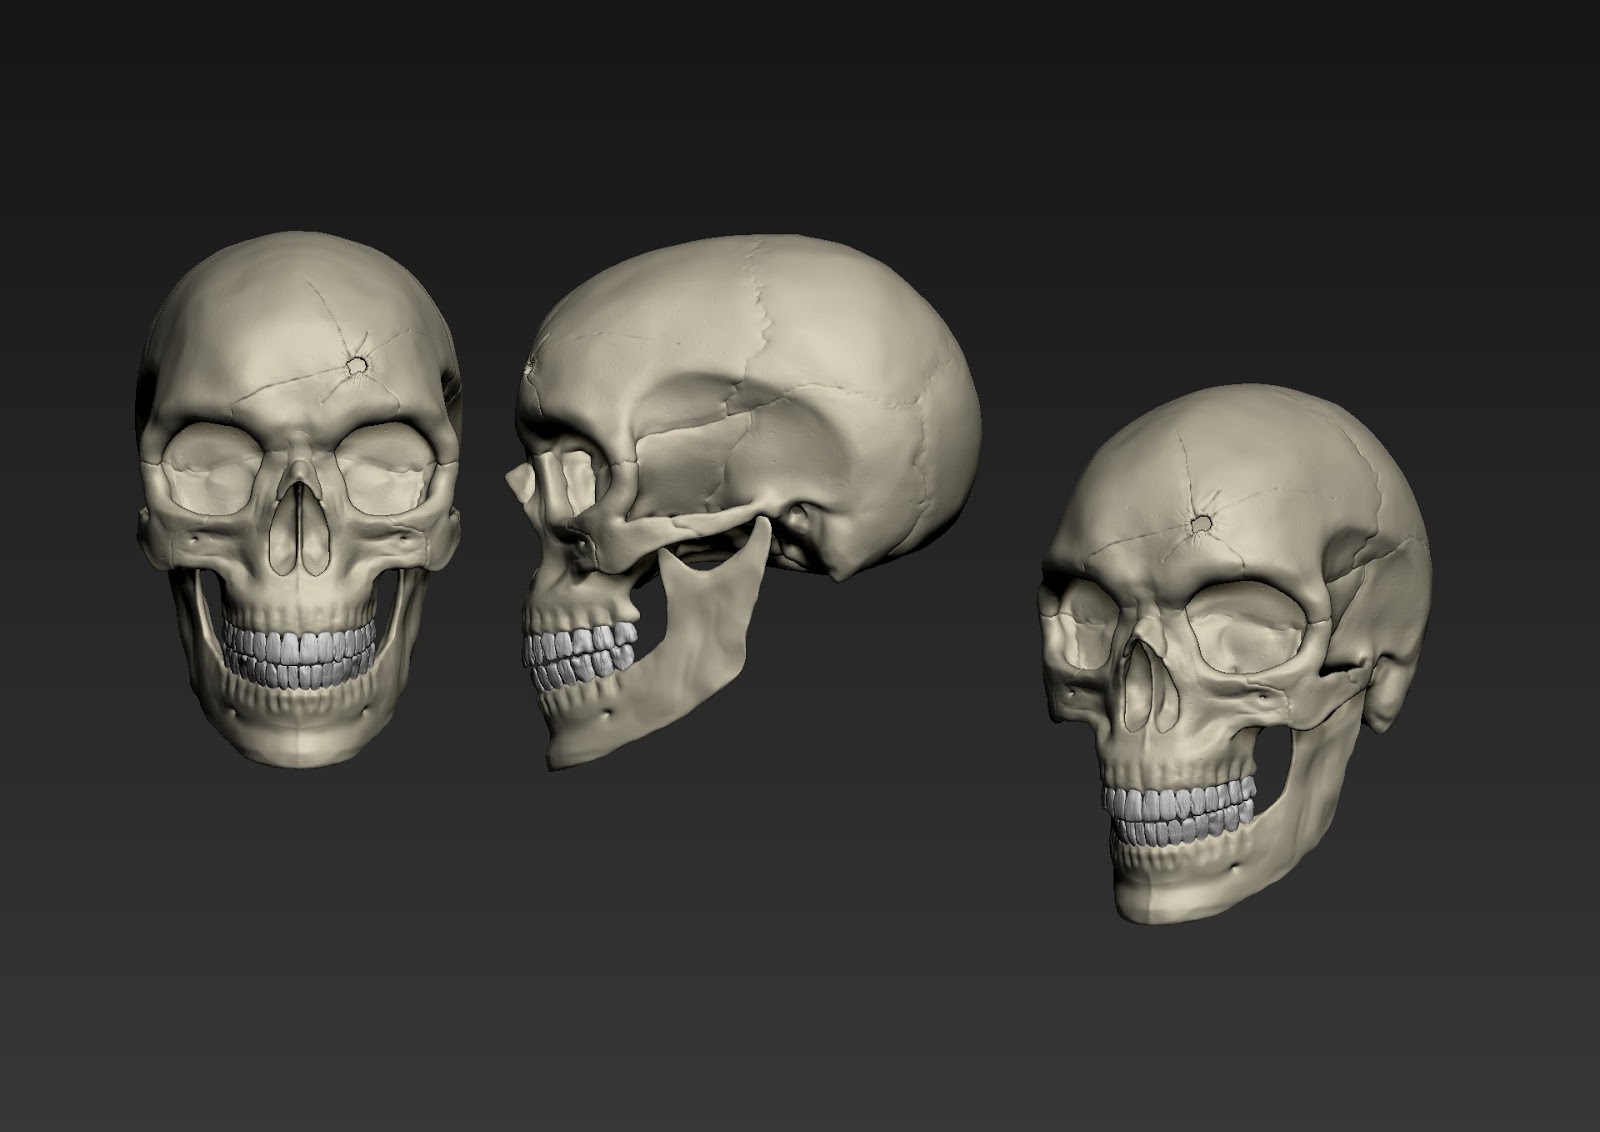
So finally my skull is ended. This is the final result with the texture in Zbrush.
And today is a very importat day for me... it's my last day on my job!! So now i'm entirely focused on 3d art !!
------------------------------------------------------------------------------------------------------------------------
Update 1:
Still working on my skull. My art teacher always said "you never ends a work, just give up, but you need to be able to stop it and give up", so, for this first attemp to introduce myself in Zbrush (again), I think that I give up this model. So I start today with the texturing.
I think that the eye holes ar too big (little alien) but I remain steadfast in my decision to give up the modelling!!
------------------------------------------------------------------------------------------------------------------------
So I'm here again at last!, I archieve to save enough money to try again and keep with my dream (ufff it is very very hard) so... go ahead (take two)
For the last...(hummm...a lot of) months I refresh my habilities with 3D Studio, ZBrush and Unreal, and here's the first ptoblem for me: With 3D Max no problem, it's an easy program, but Zbrush resist to me (It's a die fuc%&/$ hard program) so I went back to my old art School here in Spain and contact with my friend David Barruz. He's the Madafuc&% master in Zbrush and one of the most wonderful person that i've ever meet (here's part of his works ) and start a Zbrush course. Here's my first work under his mentoring (Is not finish, it's WIP):
It's a bit creepy but it's the best thing to understand what is "under the hood" characters (muscles and flesh).
And yes, I know that I said a long time ago "I want to be an enviro artist and bla bla bla..." It's true but to learnd all about Zbrush i need to undertand the characters (and at the begining, I prefer know about many many things in 3D, as hard surfacing, character modeling, vehicles, props,... and later, try to climb until enviro)
Many thanks for all Davichu !!
See you in space
P.D. By the way, I reactivate this blog and myself so will be updated more frequently, I promised !!
Saturday, 31 May 2014
From me to the void
Hello again !!
To much time without writting to the void.
Well.., many many things happened since my last post here. As a digest: I came back to Spain (despite how disastrous it is) but neither London nor here I had luck in my attempt to become an enviroment artist, so i did back to aeronautic industry. I was really hard to me.
But now, I'm, prepared to re-start my pursuit to create words. The only problem is that I forget almost my 3D knowledges... but no problem. I'll start from the begining again but stronger, and motivated so keep in tune
Hasta la proxima amigos !!
Friday, 6 July 2012
Arghhh tooo much!!!
I finished another art test. In this time for Splash Damage. In this case was a retrofitting building ( I love it !!!). The concept artist is property of Splash Damage. I don't know was the intention of this test so I try to do something great with minimum geometry and maps (it's something common for all videogames) and here it is:
The illumination was made with a standard lights with three point illumination technique and default Scanline. I did this to avoid cheats, because it's really easy archive a great result with V-ray for example, but it's quite complicate replicate this in a game engine. So this is the more accurate way to see how will be inside a standard game engine (as Unreal, cryengine or Unity).
However, the shaders in game engine let you tweak more parameters than a standard 3D max shaders so it's probably that the final result will be much better.
Stats: two difusee maps 1024x1024 with AO baked and one 1024x1024 normal map with specular baked in blue chanel. Geometry: 7540 tris
I put a lot of thing from films and games as a tribute. How many can you recognise?
Carpe Omnia !!
Thursday, 5 July 2012
Hi there!!:
A couple of weeks ago I had a test for Gameloft in Barcelona. Regrettably not worked but here's the vehicle test. The concept art is property of Gameloft.
The maximum tris amount was 10K. This have 7,5K and three 512x512 maps: one for diffuse, one for normal and the last for the specular. I thought include the specular map (8 bit grey map) into blue channel normal map but they want all these maps.
Friday, 8 June 2012
Updated 13/06/2012: I'm a little bit delayed with this because I've started a new Scifi proyect and now I've two open fronts !!
Original Post:
Long time since I made a vehicle, so I start a new project. At the beginning I chose a tank, but is too classic, so I thought why not use my knowledge about aircraft and made some different? I remember a really original helicopters manufactured called "Kamov". It's a Russian company that made helicopters without tail rotor and use a double coaxial main rotor It's really great. So I chose the Kamov KA-50 a tactical attack helicopter. Today I finished the main rotor head and blades
And the main structure of the helicopter.
Next step add detail to main structure!! In the next days I'll update this. Stay tuned!!
See you!!
Tuesday, 5 June 2012
Friday, 1 June 2012
This was one of my first jobs. It was for a playable demo for a indie
game. It was really hard 'cause I made all, I mean: level design,
environment, props, collisions,... And it was really huge. Almost 4
minutes without enemies nor props to interact.
Their want something similar to Fable 3 but more "diablizzard".
The first design was really monochromatic and boring so I tried to convince them to put some of colour and different structures. It's really easy boring the player. I added the crystals, a river, two different hanging bridges,...
Good for me!! Three times more work but no delivery date change!!
Anyway... I enjoyed a lot his work. I learnt a lot of things about optimize geometry, maps and UDK. and it was my first entire level !!
You have a video in game of his level on vimeo: http://vimeo.com/36291735
I hope that you like it
See ya
Saturday, 26 May 2012
Hi There !!
I'm sorry for this break. I was in Spain with my family and looking for another room (London is really expensive!).
The intention of this challenge was achieve the maximum detail with minimum polygons and maps. I wanted to make a brick wall. Obviously, I never use this in a real video game (maybe in a mobile platform) but it was an excellent exercise to me.
First I sculpted the bricks alone in Zbrush. It's no necessary make a pixel-size detail because when you baked the normal map may be appear some artifacts. So it's better make two normal map one with the bricks and other with the detail extract from the diffuse and overlay them.
I prefer use decimation master and export a medium poly mesh into 3DS Max and make little changes (rotations, scales...) to make a non repetitive pattern. However It must be tilelable so be carefully with the borders. To be sure I prefer use one of the bricks and halve. I put a basic diffuse map that later I will use as a base.
Ok..so..now I baked the diffuse, normal map, Ambient occlusion (with Vray light material and Vray dirt, but you can do with Mental Ray) and a color variation (different levels of grey for each brick) into a single plane. Normally I like to make a gradient ramp just place a UVWmap modifier over the wall to make an effect dark below and bright over (normally below there's more humidity so it become darker). Mixing the layer in Photoshop we have a good diffuse
See you !!
I'm sorry for this break. I was in Spain with my family and looking for another room (London is really expensive!).
The intention of this challenge was achieve the maximum detail with minimum polygons and maps. I wanted to make a brick wall. Obviously, I never use this in a real video game (maybe in a mobile platform) but it was an excellent exercise to me.
First I sculpted the bricks alone in Zbrush. It's no necessary make a pixel-size detail because when you baked the normal map may be appear some artifacts. So it's better make two normal map one with the bricks and other with the detail extract from the diffuse and overlay them.
I prefer use decimation master and export a medium poly mesh into 3DS Max and make little changes (rotations, scales...) to make a non repetitive pattern. However It must be tilelable so be carefully with the borders. To be sure I prefer use one of the bricks and halve. I put a basic diffuse map that later I will use as a base.
Ok..so..now I baked the diffuse, normal map, Ambient occlusion (with Vray light material and Vray dirt, but you can do with Mental Ray) and a color variation (different levels of grey for each brick) into a single plane. Normally I like to make a gradient ramp just place a UVWmap modifier over the wall to make an effect dark below and bright over (normally below there's more humidity so it become darker). Mixing the layer in Photoshop we have a good diffuse
Ok but this is not a ruin..it's just a brick wall. So it need moss and specular power and a little bit of debris.
Ok much better. Now apply the color variation map and increase the contrast to improve the volume:
Mmmm yeah...ok. Now from this diffuse can make a great detail normal map just desaturate it and increase the contrast with levels filter and a specular map with hi pass filter and levels (and maybe another couple of filters). So we have 3 maps (in UDK we can reduce to two using the blue channel to put the specular, or making a specular map using the diffuse map):
and this is the final result:
In just one plane (2 tris).
Normally is better take a lowpoly plane but with some volume, ledges and other interest stuff. But it's a interesting exercise. I hope that you enjoy with this!!
Wednesday, 25 April 2012
Hi there!!
Today I was thinking about one of my characters. I always love the Steampunk and Cyberpunk themes, maybe because I'm a 80's generation (the best haha).
Well one day I was looking for some inspiration and found an amazing Steampunk golem design by Emerson Tung. I love the work of this man. I recommend see his work because It's amazing.
It's not finish yet. For the head I wanted make a tribute to Warhammer 40K so I made an Space Marine helmet ha! ;)
Although it's harder, I love make asymmetric characters for two reasons. First it's a challenge 'cause you can't use symmetric tools so I think it's more artisan. The second reason it's I think that have a better appearance... I don't know....maybe it's a optical effect but I always try to make a asymmetrical characters.
This another character. It's a really lowpoly base mesh, but as you can see she's asymmetrical too. This one soon be leaving to Zbrush. I promise show you when I finished.
See you !!
Monday, 23 April 2012
Hi everyone !!
Yesterday, here in London, we have a really beautiful morning, so I went to Victoria park to take some pictures to make textures.
For me it's really important that if I use photographs, that no lights and shadows. It's important that has a neutral light, and always make the shoot in RAW because later I can manipulate parameters.
Here's the first picture. It's a Birch tree (I love the Birch bark because is really easy to identificate and it's easy link Birch tree with beatifull nature):
First I make picture power of two (It's really important that if you use the texture in UDK be power of two) and remove the elements that are too unique for make a neutral texture. So now I can be a tilelable texture:
As you can see, there's different light and color areas so I work on it to make continuous and neutral all texture. There the result tiled 2x2:
Ok. But it a little bit bored, so make more interest texture. First, normally the bark trees have moss or lichen, so go on. I use a contrast blue channel to make a mask and then blend a moss texture:
Oks, not bad but it's a little bit plane. I work on each map separately and make a AO map. Later mix both maps and multiply with the difuse:
Much better. This map (AO) will be stored in blue channel of normal map.Why? Two reasons. First one, as I said in the last post, save memory. But... why not multiply now and make a difuse map with the AO baked? well... I can do this but, if I keep separately, inside UDK I can manipulate so for me it's better.
Final texture it's two 512x512 DXT1 textures (one for the difuse and the other for the normal and AO) really memory cheap:
Thursday, 19 April 2012
Wall Piece
Today I started my new demo reel. It will have two pieces (o maybe three): A cave as a inner, and a mountain-forest village as outside. I want both to experiment with lights and specially with cube or spherical environment maps.
So here I am. Today I made a rocky cliff piece. I started modelling a hi-poly on Zbrush.
I prefer export this model to 3D Max using Decimation Master and use the same mesh to make a Low-poly model with pro optimizer. It really save a lot of time!!. Then I unwrap this low-poly model and bake normal map. Other people likes unwrap directly in Zbrush... well... it's a matter of taste.
Now come the ambient occlusion to get detail to diffuse map. I always use Vray (I love it, thanks Chaos Group!!) to make a good AO map. For this, I use Vray light material with Vray Dirt Map.
Then in photoshop mix my normal map with the normal map that I get to the difusse map (with NDO2, crazybump, pixplant,...) For a best AO mix the blue channels from this normal with my Vray AO. And this is the result:
So this is my base. Now I use UDK to make details and make a really good normal map. For save memory I always clean the blue channel of the normal map and put there my AO map, so I have normal and AO map in the same picture without alpha channel (I always use a DXT3 maps to keep low my memory footprint and reduce engine memory calls).
And final result in UDK is this:
Now use vertex paint to bland textures,one for the surface, and this for the rocks.
So I hope that like you
See you in space !!
Saturday, 14 April 2012
The journey begins...
Hi everybody!!
How's thing?. Today I start a new blog about the 3D and computer graphics. I try to be a environmental artist, so I will work hard and make it happen...
But first a little about me...
My Name is Gorka Sanchez. I'm from Spain but I've move to London to improve (well... in fact to learn) my English and my formation as a 3D artist.
I always want to be a 3D artist but I never had the chance because I started in aircraft industry. But one day two years ago said "come on...or now or never" and started my formation as a 3D artist and I'm here.
Why a 3D artist?, well...It's easy to explain but I'm not sure if it's easy to understand. In my case... to create worlds.
When I was a child and played video games like Flashback: quest for identity or The legend of Zelda: Ocarina of Time, (for me, two of the best games in history) and walk for these worlds, always thought "It must be great be there and live those adventures"
And that brings me to this point and to this blog. I try to make worlds for you and everybody. And will be great, you will see !! You can help me with your opinion (no matter if you know 3D or not, both opinions are important)
So let's go!!
Subscribe to:
Posts (Atom)


