Showing posts with label UDK. Show all posts

Saturday, 26 May 2012

Hi There !!

I'm sorry for this break. I was in Spain with my family and looking for another room (London is really expensive!).
The intention of this challenge was achieve the maximum detail with minimum polygons and maps. I wanted to make a brick wall. Obviously, I never use this in a real video game (maybe in a mobile platform) but it was an excellent exercise to me.
First I sculpted the bricks alone in Zbrush. It's no necessary make a pixel-size detail because when you baked the normal map may be appear some artifacts. So it's better make two normal map one with the bricks and other with the detail extract from the diffuse and overlay them.


I prefer use decimation master and export a medium poly mesh into 3DS Max and make little changes (rotations, scales...) to make a non repetitive pattern. However It must be tilelable so be carefully with the borders. To be sure I prefer use one of the bricks and halve. I put a basic diffuse map that later I will use as a base.


Ok..so..now I baked the diffuse, normal map, Ambient occlusion (with Vray light material and Vray dirt, but you can do with Mental Ray) and a color variation (different levels of grey for each brick) into a single plane. Normally I like to make a gradient ramp just place a UVWmap modifier over the wall to make an effect dark below and bright over (normally below there's more humidity so it become darker).  Mixing the layer in Photoshop we have a good diffuse


Ok but this is not a ruin..it's just a brick wall. So it need moss and specular power and a little bit of debris.


Ok much better. Now apply the color variation map and increase the contrast to improve the volume:


Mmmm yeah...ok. Now from this diffuse can make a great detail normal map just desaturate it and increase the contrast with levels filter and a specular map with hi pass filter and levels (and maybe another couple of filters). So we have 3 maps (in UDK we can reduce to two using the blue channel to put the specular, or making a specular map using the diffuse map):


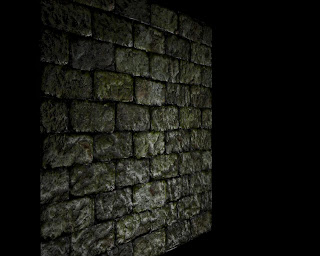
and this is the final result:


In just one plane (2 tris). 

Normally is better take a lowpoly plane but with some volume, ledges and other interest stuff. But it's a interesting exercise. I hope that you enjoy with this!!

See you !!

Monday, 23 April 2012

Hi everyone !!

Yesterday, here in London, we have a really beautiful morning, so I went to Victoria park to take some pictures to make textures.
For me it's really important that if I use photographs, that no lights and shadows. It's important that has a neutral light, and always make the shoot in RAW because later I can manipulate parameters.

Here's the first picture. It's a Birch tree (I love the Birch bark because is  really easy to identificate and it's easy link Birch tree with beatifull nature):


First I make picture power of two (It's really important that if you use the texture in UDK be power of two) and remove the elements that are too unique for make a neutral texture. So now I can be a tilelable texture:


As you can see, there's different light and color areas so I work on it to make continuous and neutral all texture. There the result tiled 2x2:


Ok. But it a little bit bored, so make more interest texture. First, normally the bark trees have moss or lichen, so go on. I use a contrast blue channel to make a mask and then blend a moss texture:


Oks, not bad but it's a little bit plane. I work on each map separately and make a AO map. Later mix both maps and multiply with the difuse:


Much better. This map (AO) will be stored in blue channel of normal map.Why? Two reasons. First one, as I said in the last post, save memory. But... why not multiply now and make a difuse map with the AO baked? well... I can do this but, if I keep separately, inside UDK I can manipulate so for me it's better.


Final texture it's two 512x512 DXT1 textures (one for the difuse and the other for the normal and AO) really memory cheap:


Thursday, 19 April 2012

Wall Piece

Hi there !!

Today I started my new demo reel. It will have two pieces (o maybe three): A cave as a inner, and a mountain-forest village as outside. I want both to experiment with lights and specially with cube or spherical environment maps.
So here I am. Today I made a rocky cliff piece. I started modelling a hi-poly on Zbrush.


I prefer export this model to 3D Max using Decimation Master and use the same mesh to make a Low-poly model with pro optimizer. It really save a lot of time!!. Then I unwrap this low-poly model and bake normal map. Other people likes unwrap directly in Zbrush... well... it's a matter of taste.
Now come the ambient occlusion to get detail to diffuse map. I always use Vray (I love it, thanks Chaos Group!!) to make a good AO map. For this, I use Vray light material with Vray Dirt Map.
Then in photoshop mix my normal map with the normal map that I get to the difusse map (with NDO2, crazybump, pixplant,...) For a best AO mix the blue channels from this normal with my Vray AO. And this is the result:


So this is my base. Now I use UDK to make details and make a really good normal map. For save memory I always clean the blue channel of the normal map and put there my AO map, so I have normal and AO map in the same picture without alpha channel (I always use a DXT3 maps to keep low my memory footprint and reduce engine memory calls).
And  final result in UDK is this:
Now use vertex paint to bland textures,one for the surface, and this for the rocks.
So I hope that like you

See you in space !!